
使用Maven开发Web应用详细步骤 图片看不了?点击切换HTTP 返回上层
目前的 Java 程序员最常要面对的是 Java Web 应用。所以本节的主要内容针对的是最基本的 JSP/Servlet Web 应用。
1. 实现一个简单的 JSP/Servlet。
2. 实现经典的 MVC 版本的用户 CRUD。
1)选择 File→New→Others 命令。选择 Create Maven Project 命令,单击“下一步”按钮。选中创建 Web 应用工程的 Archetype,如图 1 所示。
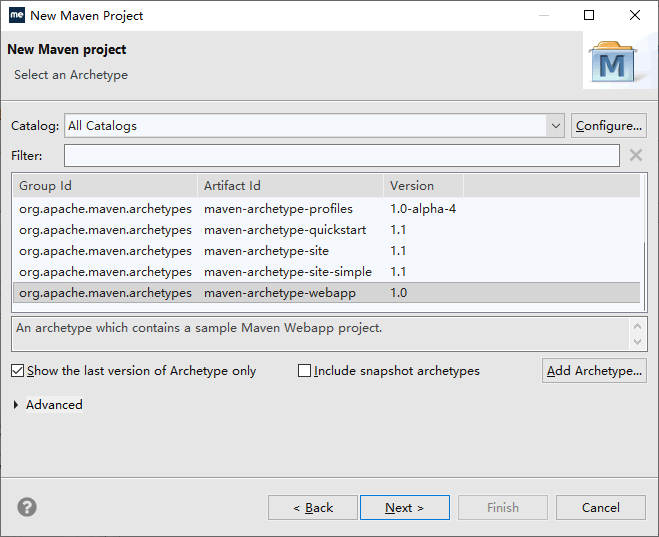
图 1 选择Web Archetype
也可以选择其他类似的,创建 Web 应用的都可以,比如 maven-archetype-webapp 也可以。当然,也可以选择从网上找到坐标后的 Archetype 插件,再安装进去。
怎么安装新的 Archetype 呢?单击图中的 Add Archetype… 按钮,在出现的窗口中输入在网上找到的插件坐标信息,如图 2 所示。

图 2 添加 Archetype
单击 OK 按钮,MyEclipse 会自动下载该构件。重新打开创建工程的向导页面,就可以发现新增了刚刚添加的 Archetype 插件,如图 3 所示。
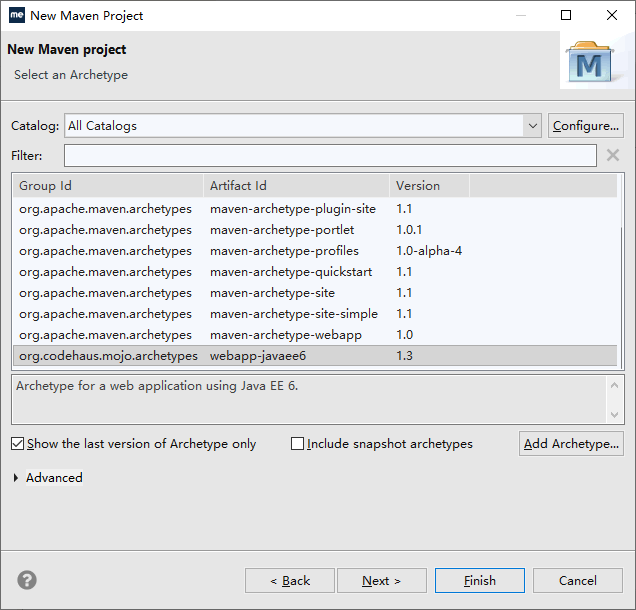
图 3 选择 webapp-javaee6 Archetype
2)点击“next”,在下一个界面中输入新创建的 Web 工程的坐标信息和包名,如图 4 所示。
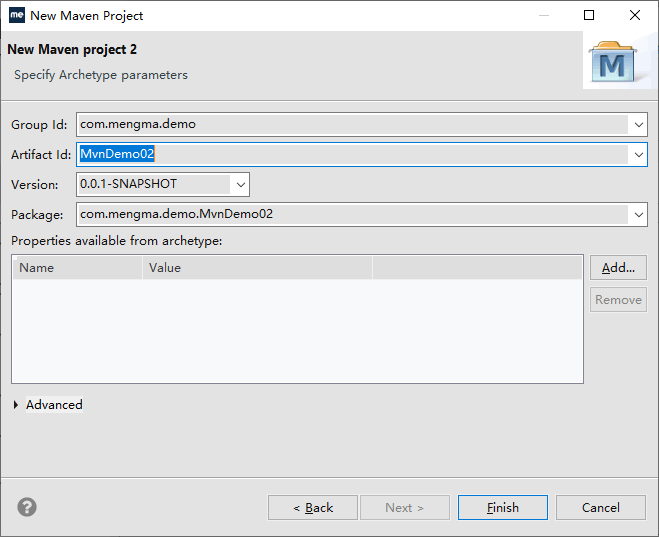
图 4 Maven项目坐标
3)单击 Finish 按钮,M2Eclipse 会自动创建一个 Web 工程 MvnDemo02。其在 src/main 目录下添加了 webapp 目录,里面有 Web 应用特有的 WEB-INF 目录,web.xml 和 index.jsp 等。
其中,webapp 目录和里面的文件以及结构在 Maven 中也是固定的。这样就创建好了 Web 应用工程。
index.jsp,里面显示输入框,能提交输入的内容,代码如下所示:
welcome.jsp,显示问候信息,代码如下所示:
welcomeServlet,接收 index.jsp 发过来的名称,生成问候信息,转给 welcome.jsp 显示。
当然,除了编写代码外,还需要配置 web.xml,servlet 的,web.xml 代码如下所示:
一个 Web 应用构建好后,不只是编译打包安装就可以了,还需要将它发布到 Web 服务器中进行测试调试才行。这里主要介绍两种发布到 Tomcat 7 服务器启动测试的方式。在项目开发过程中可以根据自己的需要,选择其中一种。
在 MyEclipse 中配置 Web 服务器运行环境。
选择 MyEclipse 菜单 Window→Preferences 命令,打开 Preferences 窗口,选中左边树 Server→Runtime Environment,如图 5 所示。
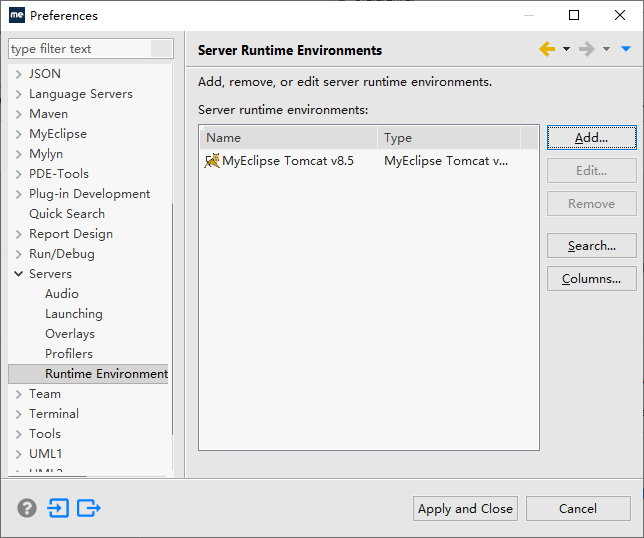
图 5 MyEclipse的Web服务器
单击右边的 Add… 按钮,弹出一个选择服务器的窗口。选中窗口中的 Apache Tomcat v 7.0 服务器,如图 6 所示。
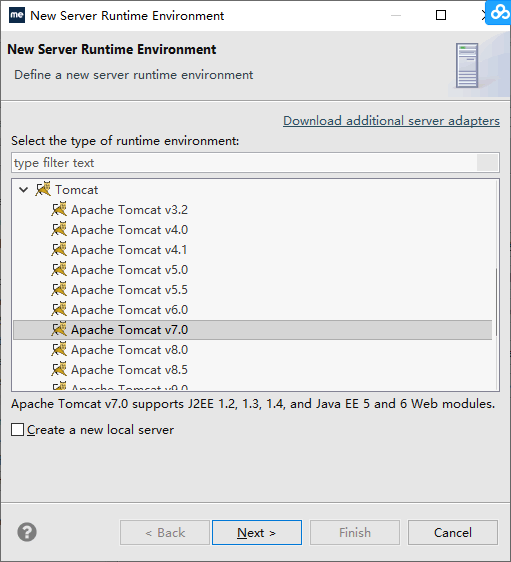
图 6 添加 Tomcat 7.0
单击 Next 按钮,进入选择 Tomat Server 配置页面,选择 Tomcat 的安装目录和 JRE 运行环境(JDK),如图 7 所示。
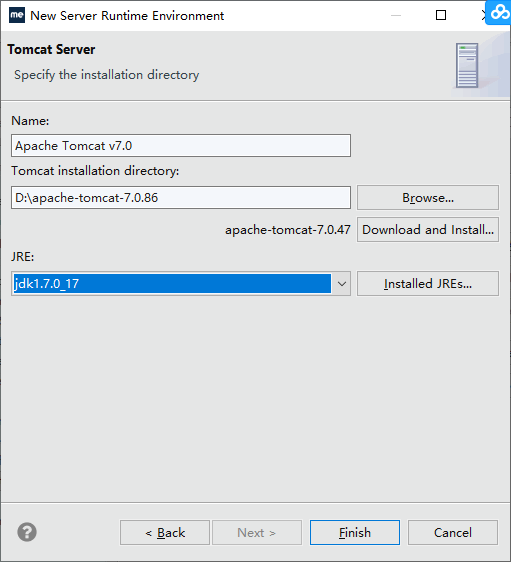
图 7 添加 Tomcat 的 Java home
单击 Finish 和 Apply and Close 按钮,关闭所有配置窗口,完成 MyEclipse 中的 Web Server 配置。
右击“工程”,选择 Run As→Maven build 命令,打开自定义 launch 窗口,在 Goals 中输入启动的插件名和目标“jetty:run”,如图 8 所示。
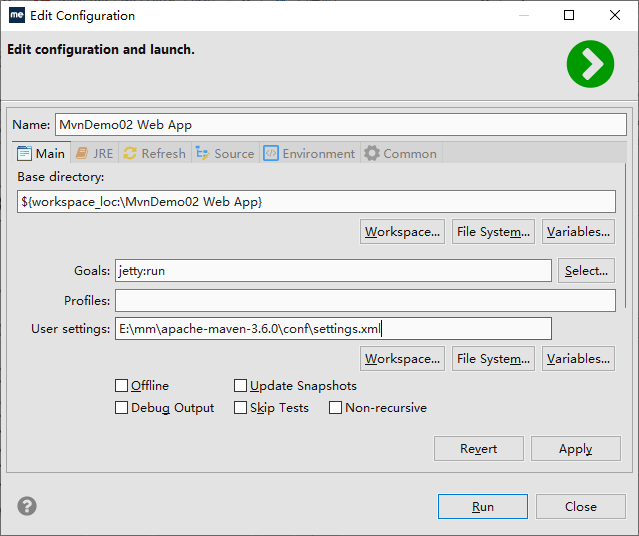
图 8 运行 jetty
单击 Run 按钮运行一次后,以后每次都可以在 Run As→Maven build 命令中选择重复运行。
服务器启动了,接下来打开浏览器,输入:
接下来要做的是启动 Web 服务器,按以前的方式打开浏览器浏览页面。
Gargo 在 pom.xml 中的插件配置如下所示。
右击“工程”,选择 Run As→Maven install 命令后,就可以在 Tomcat 7 的发布目录下发现 MvnDemo02.war,启动后它就能自动发布并且能被访问。
开发 Web 应用的思路
一切还是以实际案例进行,不过分两步。1. 实现一个简单的 JSP/Servlet。
- 搭建创建 Web 应用工程的环境。
- 创建 Web 应用工程。
- Web 应用工程的目录结构。
- 结合 Web 服务器,发布 Web 应用。
- 体验 Web 应用的开发和发布测试过程。
2. 实现经典的 MVC 版本的用户 CRUD。
- 熟练第 1 步中的几个方面。
- 结合典型的业务逻辑,实现 CRUD。
实现 Web 版 HelloWorld
安装配置 Web 应用的 Archetype Catalog,按照前面创建普通 Java 工程的步骤。1)选择 File→New→Others 命令。选择 Create Maven Project 命令,单击“下一步”按钮。选中创建 Web 应用工程的 Archetype,如图 1 所示。
图 1 选择Web Archetype
也可以选择其他类似的,创建 Web 应用的都可以,比如 maven-archetype-webapp 也可以。当然,也可以选择从网上找到坐标后的 Archetype 插件,再安装进去。
怎么安装新的 Archetype 呢?单击图中的 Add Archetype… 按钮,在出现的窗口中输入在网上找到的插件坐标信息,如图 2 所示。
图 2 添加 Archetype
单击 OK 按钮,MyEclipse 会自动下载该构件。重新打开创建工程的向导页面,就可以发现新增了刚刚添加的 Archetype 插件,如图 3 所示。
图 3 选择 webapp-javaee6 Archetype
2)点击“next”,在下一个界面中输入新创建的 Web 工程的坐标信息和包名,如图 4 所示。
图 4 Maven项目坐标
3)单击 Finish 按钮,M2Eclipse 会自动创建一个 Web 工程 MvnDemo02。其在 src/main 目录下添加了 webapp 目录,里面有 Web 应用特有的 WEB-INF 目录,web.xml 和 index.jsp 等。
其中,webapp 目录和里面的文件以及结构在 Maven 中也是固定的。这样就创建好了 Web 应用工程。
编写样例代码
工程创建好了,下一步就是写测试代码了。接下来会写 3 个代码(2 个 jsp 和 1 个servlet)。index.jsp,里面显示输入框,能提交输入的内容,代码如下所示:
1 2 3 4 5 6 7 8 9 10 11 12 13 | <%@page contentType="text/html" pageEncoding="UTF-8"%><html> <head> <meta http-equiv="Content-Type" content="text/html; charset=UTF-8"> <title>Index JSP</title> </head> <body> <form action="welcomeServlet" method="post"> 请输入问候人名:<input type='text' name="name"/><br/> <input type='submit' value='问候'/> </form> </body></html> |
1 2 3 4 5 6 7 8 9 10 | <%@page contentType="text/html" pageEncoding="UTF-8"%><html> <head> <meta http-equiv="Content-Type" content="text/html; charset=UTF-8"> <title>Welcome JSP</title> </head> <body> 问候信息:${welcome } </body></html> |
1 2 3 4 5 6 7 8 9 10 11 12 13 14 15 16 17 18 19 20 21 22 23 24 25 | import java.io.IOException;import javax.servlet.ServletException;import javax.servlet.http.HttpServlet;import javax.servlet.http.HttpServletRequest;import javax.servlet.http.HttpServletResponse;/*** Servlet implementation class WelcomeServlet*/public class WelcomeServlet extends HttpServlet { private static final long serialVersionUID = 1L; /** * @see HttpServlet#service(HttpServletRequest request, HttpServletResponse * response) */ protected void service(HttpServletRequest request, HttpServletResponse response) throws ServletException, IOException { request.setCharacterEncoding("UTF-8"); String name = request.getParameter("name"); String welcome = "Hello," + name; request.setAttribute("welcome", welcome); request.getRequestDispatcher("/index.jsp").forward(request, response); }} |
1 2 3 4 5 6 7 8 9 10 11 12 13 14 15 16 17 18 19 20 21 22 23 24 | <?xml version="1.0" encoding="UTF-8"?><web-app xmlns:xsi="http://www.w3.org/2001/XMLSchema-instance" xmlns="http://java.sun.com/xml/ns/javaee" xsi:schemaLocation="http://java.sun.com/xml/ns/javaee http://java.sun.com/xml/ns/javaee/web-app_2_5.xsd" version="2.5"> <display-name>MvnDemo02</display-name> <session-config> <session-timeout>30</session-timeout> </session-config> <welcome-file-list> <welcome-file>index.jsp</welcome-file> </welcome-file-list> <servlet> <description></description> <display-name>WelcomeServlet</display-name> <servlet-name>WelcomeServlet</servlet-name> <servlet-class>com.mengma.demo.MvnDemo02.WelcomeServlet</servlet-class> </servlet> <servlet-mapping> <servlet-name>WelcomeServlet</servlet-name> <url-pattern>/WelcomeServlet</url-pattern> </servlet-mapping></web-app> |
构建 Web 项目
前期的构建过程同前面基本的 Java 工程一样,根据自己的需要,在 pom.xml 中配置好对应功能的插件,再运行对应的图形化菜单命令就可以了,在这里不做重复说明。一个 Web 应用构建好后,不只是编译打包安装就可以了,还需要将它发布到 Web 服务器中进行测试调试才行。这里主要介绍两种发布到 Tomcat 7 服务器启动测试的方式。在项目开发过程中可以根据自己的需要,选择其中一种。
1. 使用 Maven 的 Jetty 插件部署 Web
在 pom.xml 中添加 Jetty 插件的坐标信息,内容如下:1 2 3 4 5 6 7 8 | <plugin> <groupId>org.mortbay.jetty</groupId> <artifactId>maven-jetty-plugin</artifactId> <version>6.1.26</version> <configuration> <webAppSourceDirectory>${basedir}/src/main/webapp</webAppSourceDirectory> </configuration></plugin> |
选择 MyEclipse 菜单 Window→Preferences 命令,打开 Preferences 窗口,选中左边树 Server→Runtime Environment,如图 5 所示。
图 5 MyEclipse的Web服务器
单击右边的 Add… 按钮,弹出一个选择服务器的窗口。选中窗口中的 Apache Tomcat v 7.0 服务器,如图 6 所示。
图 6 添加 Tomcat 7.0
单击 Next 按钮,进入选择 Tomat Server 配置页面,选择 Tomcat 的安装目录和 JRE 运行环境(JDK),如图 7 所示。
图 7 添加 Tomcat 的 Java home
单击 Finish 和 Apply and Close 按钮,关闭所有配置窗口,完成 MyEclipse 中的 Web Server 配置。
右击“工程”,选择 Run As→Maven build 命令,打开自定义 launch 窗口,在 Goals 中输入启动的插件名和目标“jetty:run”,如图 8 所示。
图 8 运行 jetty
单击 Run 按钮运行一次后,以后每次都可以在 Run As→Maven build 命令中选择重复运行。
服务器启动了,接下来打开浏览器,输入:
http://localhost:8080/MvnDemo02/index.jsp
这样就可以访问第一个页面了。2. 使用 cargo-maven2-plugin 插件部署 Web
使用 cargo 插件相对简单,只需在 pom.xml 中进行配置,指定部署应用所需要的信息,再运行 Run As→Maven install 命令,cargo 插件自动会把打成 war 包的应用,发布到指定 Web 服务器的发布目录下。接下来要做的是启动 Web 服务器,按以前的方式打开浏览器浏览页面。
Gargo 在 pom.xml 中的插件配置如下所示。
1 2 3 4 5 6 7 8 9 10 11 12 13 14 15 16 17 18 19 20 21 22 23 24 25 26 27 28 29 30 31 32 33 34 35 36 37 38 39 40 41 42 43 44 45 46 47 48 49 50 51 52 53 54 55 56 57 58 59 60 61 62 63 64 65 66 67 68 69 70 71 72 73 74 75 76 77 78 79 80 81 82 83 84 85 86 87 88 89 90 91 92 93 94 95 96 97 98 99 100 101 102 103 104 105 106 107 108 109 110 111 112 113 114 115 116 117 118 119 120 121 122 123 124 125 126 127 128 129 130 131 132 133 134 135 136 137 138 139 140 141 142 143 144 145 146 147 148 149 150 | <project xmlns="http://maven.apache.org/POM/4.0.0" xmlns:xsi="http://www.w3.org/2001/XMLSchema-instance" xsi:schemaLocation="http://maven.apache.org/POM/4.0.0 http://maven.apache.org/xsd/maven-4.0.0.xsd"> <modelVersion>4.0.0</modelVersion> <groupId>cn.com.mvnbook.demo</groupId> <artifactId>MvnDemo02</artifactId> <version>0.0.1-SNAPSHOT</version> <packaging>war</packaging> <name>MvnDemo02 Web App</name> <properties> <endorsed.dir>${project.build.directory}/endorsed</endorsed.dir> <project.build.sourceEncoding>UTF-8</project.build.sourceEncoding> </properties> <dependencies> <dependency> <groupId>javax</groupId> <artifactId>javaee-web-api</artifactId> <version>6.0</version> <scope>provided</scope> </dependency> <dependency> <groupId>junit</groupId> <artifactId>junit</artifactId> <version>4.8.1</version> <scope>test</scope> </dependency> </dependencies> <build> <plugins> <plugin> <groupId>org.mortbay.jetty</groupId> <artifactId>maven-jetty-plugin</artifactId> <version>6.1.26</version> <configuration> <webAppSourceDirectory>${basedir}/src/main/webapp</webAppSourceDirectory> </configuration> </plugin> <plugin> <!-- 指定插件名称及版本号 --> <groupId>org.codehaus.cargo</groupId> <artifactId>cargo-maven2-plugin</artifactId> <version>1.4.8</version> <configuration> <!--是否说明,操作start、stop等后续操作必须等前面操作完成才能继续 --> <wait>true</wait> <!-- 容器的配置 --> <container> <!-- 指定tomcat版本 --> <containerId>tomcat7x</containerId> <!-- 指定类型:standalone, installed等 --> <type>installed</type> <!-- 指定Tomcat的位置,即catalina.home --> <home>C:\work\servers\apache-tomcat-7.0.69</home> </container> <!-- 具体的配置 --> <configuration> <!-- 类型,existing:存在 --> <type>existing</type> <!-- Tomcat的位置,即catalina.home --> <home>C:\work\servers\apache-tomcat-7.0.69</home> </configuration> <deployables> <!-- 部署设置 --> <deployable> <!-- 部署的War包名等 --> <groupId>cn.com.mvnbook.demo</groupId> <artifactId>MvnDemo02</artifactId> <type>war</type> <properties> <context>MvnDemo02</context> <!-- 部署路径 --> </properties> </deployable> </deployables> <deployer> <!-- 部署配置 --> <type>installed</type> <!-- 类型 --> </deployer> </configuration> <executions> <!-- 执行的动作 --> <execution> <id>verify-deployer</id> <phase>install</phase> <!-- 解析install --> <goals> <goal>deployer-deploy</goal> </goals> </execution> <execution> <id>clean-deployer</id> <phase>clean</phase> <goals> <goal>deployer-undeploy</goal> </goals> </execution> </executions> </plugin> <plugin> <groupId>org.apache.maven.plugins</groupId> <artifactId>maven-compiler-plugin</artifactId> <version>2.3.2</version> <configuration> <source>1.6</source> <target>1.6</target> <compilerArguments> <endorseddirs>${endorsed.dir}</endorseddirs> </compilerArguments> </configuration> </plugin> <plugin> <groupId>org.apache.maven.plugins</groupId> <artifactId>maven-war-plugin</artifactId> <version>2.1</version> <configuration> <failOnMissingWebXml>false</failOnMissingWebXml> </configuration> </plugin> <plugin> <groupId>org.apache.maven.plugins</groupId> <artifactId>maven-dependency-plugin</artifactId> <version>2.1</version> <executions> <execution> <phase>validate</phase> <goals> <goal>copy</goal> </goals> <configuration> <outputDirectory>${endorsed.dir}</outputDirectory> <silent>true</silent> <artifactItems> <artifactItem> <groupId>javax</groupId> <artifactId>javaee-endorsed-api</artifactId> <version>6.0</version> <type>jar</type> </artifactItem> </artifactItems> </configuration> </execution> </executions> </plugin> </plugins> <finalName>MvnDemo02</finalName> </build></project> |