Android图片视图和图片按钮 图片看不了?点击切换HTTP 返回上层
ImageView 是用于显示图片的组件,在很多场合都有比较普遍的使用。
ImageView 可以显示任意图像,加载各种来源的图片(如资源或图片库)。它还可以负责计算图片的尺寸,以便在任意的布局中使用,并且可以提供缩放或者着色等选项供开发者使用。
ImageButton 是 ImageView 的子类,相当于一个表明是图片而不是文字的 Button。其使用方法和 Button 完全相同。
下面通过一个实例来了解一下这两个组件的使用方法。在工程 WidgetDemo 的布局文件 main.xml 中添加一个名为 ImageButtonDemo 的 Button,用以启动 ImageButtonActivity。
在 main.xml 中添加代码如下:
单击Button并启动RatingBarActivity的代码如下:
同时在 AndroidManifest.xml 文件中声明该 Activity:

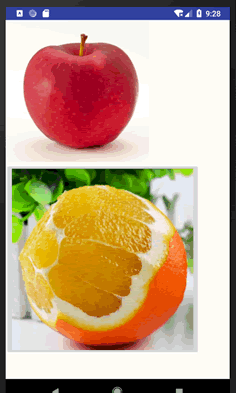
图 1 ImageButtonActivity 的运行效果
ImageButtonActivity 的布局文件 imgbtn.xml 内容如下:
该文件使用 LinearLayout 布局,其中放入了一个 ImageView 组件和一个 ImageButton 组件。两个组件都通过 android:src 属性指定了显示的图片。
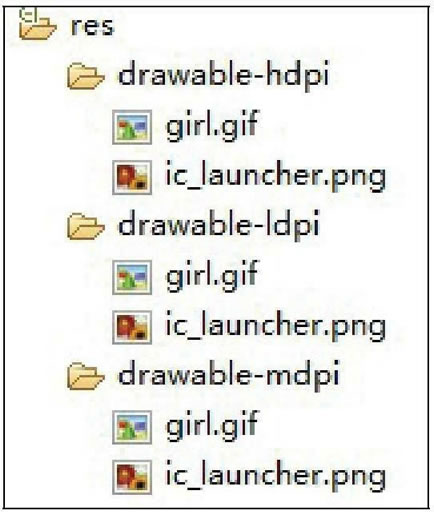
该实例用到了两个图片资源,一个为 girl,另一个为 ic_launcher,如图 2 所示。
由于 Android 会根据手机设备的配置高低选择不同的资源,因此为了应用程序的通用性,在三个 drawable 文件夹下都放置了 girl.gif 图像。ic_launcher.png 是系统自带的资源文件。

图 2 工程中的图片资源
ImageButtonActivity.java 的代码如下:
ImageButtonActivity 为 ImageButton 添加了单击监听器,对用户单击 imgbtn 的事件进行了处理。用户每次单击图片按钮,都把 ImageView 组件的宽和高增大 3。随着用户的不断单击,ImageView 中显示的图片越来越大,显示了 ImageView 组件对图片的缩放功能。
ImageView 可以显示任意图像,加载各种来源的图片(如资源或图片库)。它还可以负责计算图片的尺寸,以便在任意的布局中使用,并且可以提供缩放或者着色等选项供开发者使用。
ImageButton 是 ImageView 的子类,相当于一个表明是图片而不是文字的 Button。其使用方法和 Button 完全相同。
下面通过一个实例来了解一下这两个组件的使用方法。在工程 WidgetDemo 的布局文件 main.xml 中添加一个名为 ImageButtonDemo 的 Button,用以启动 ImageButtonActivity。
在 main.xml 中添加代码如下:
1 2 3 4 5 | <Button android:id="@+id/button10" android:layout_width="wrap_content" android:layout_height="wrap_content" android:text="ImageButtonDemo" /> |
1 2 3 4 5 6 7 8 9 | Button imgbtn = (Button)this.findViewById(R.id.button10);mgbtn.setOnClickListener(new View.OnClickListener(){ @Override public void onClick(View v){ Intent intent; intent = new Intent(MainActivity.this, ImageButtonActivity.class); startActivity(intent); }}); |
<activity android:name=".ImageButtonActivity"></activity>
ImageButtonActivity 的运行效果如图 1 所示。
图 1 ImageButtonActivity 的运行效果
ImageButtonActivity 的布局文件 imgbtn.xml 内容如下:
1 2 3 4 5 6 7 8 9 10 11 12 13 14 15 16 17 | <?xml version="1.0" encoding="utf-8"?><LinearLayout xmlns:android="http://schemas.android.com/apk/res/android" android:layout_width="match_parent" android:layout_height="match_parent" android:orientation="vertical"> <ImageView android:id="@+id/imageView1" android:layout_width="250dp" android:layout_height="250dp" android:src="@drawable/girl"/> <ImageButton android:id="@+id/imageButton1" android:layout_width="wrap_content" android:layout_height="wrap_content" android:src="@drawable/ic_launcher"/></LinearLayout> |
该实例用到了两个图片资源,一个为 girl,另一个为 ic_launcher,如图 2 所示。
由于 Android 会根据手机设备的配置高低选择不同的资源,因此为了应用程序的通用性,在三个 drawable 文件夹下都放置了 girl.gif 图像。ic_launcher.png 是系统自带的资源文件。

图 2 工程中的图片资源
ImageButtonActivity.java 的代码如下:
1 2 3 4 5 6 7 8 9 10 11 12 13 14 15 16 17 18 19 20 21 22 23 24 25 26 27 28 29 30 31 32 33 34 | package introduction.android.widgetdemo;import android.app.Activity;import android.os.Bundle;import android.view.View;import android.view.ViewGroup.LayoutParams;import android.widget.ImageButton;import android.widget.ImageView;public class ImageButtonActivity extends Activity { private ImageButton imgbtn; private ImageView imgview; @Override protected void onCreate(Bundle savedInstanceState) { // TODO Auto-generated method stub super.onCreate(savedInstanceState); setContentView(R.layout.imgbtn); imgbtn = (ImageButton) this.findViewById(R.id.imageButton1); imgview = (ImageView) this.findViewById(R.id.imageView1); imgbtn.setOnClickListener(new View.OnClickListener() { @Override public void onClick(View v) { // TODO Auto-generated method stub LayoutParams params = imgview.getLayoutParams(); params.height += 3; params.width += 3; imgview.setLayoutParams(params); } }); }} |
