
Android面板标签 图片看不了?点击切换HTTP 返回上层
在有限的手机屏幕空间内,当要浏览的内容较多,无法在一个屏幕空间内全部显示时,可以使用滚动视图来延长屏幕的空间。
当浏览的内容具有很强的类别性质时,更合适的方法是将不同类别的内容集中到各自的面板中,这时就需要使用面板标签(Tab)组件了。
Tab 组件利用面板标签把不同的面板内容切换到屏幕上,以显示不同类别的内容。
下面通过一个实例来了解一下 Tab 组件的使用方法。在工程 WidgetDemo 的布局文件 main.xml 中添加一个名为 TabDemo 的 Button,用以启动 TabActivity。
在 main.xml 中添加代码如下:
单击 Button 并启动 GridViewActivity 的代码如下:
同时在 AndroidManifest.xml 文件中声明该 Activity:
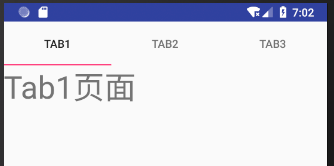
图 1 TabActivity 的运行结果
要使用 Tab 必然涉及它的容器 TabHost,TabHost 包括 TabWigget 和 FrameLayout 两部分。TabWidget 就是每个 Tab 的标签,FrameLayout 是 Tab 的内容。
TabActivity 使用的布局文件是 tab.xml。在 tab.xml 中定义了每个 Tab 中要显示的内容,代码如下:
在 FrameLayout 中我们放置了三个 TextView 组件,分别对应三个 Tab 所显示的内容,当切换不同的 Tab 时会自动显示不同的 TextView 内容。
在主程序 TabActivity 的 OnCreate() 方法中,首先获得 TabHost 的对象,并调用 setup() 方法进行初始化,然后通过 TabHost.TabSpec 增加 Tab 页,通过 setContent() 增加当前 Tab 页显示的内容,通过 setIndicator 增加页的标签,最后设定当前要显示的 Tab 页。
TabActivity 的代码如下:
除了使用上述方法设置 Tab 页面的显示内容外,还可以使用 setContent(Intent)方法启动某个 Activity,并将该 Activity 的视图作为 Tab 页面的内容。
例如:
当浏览的内容具有很强的类别性质时,更合适的方法是将不同类别的内容集中到各自的面板中,这时就需要使用面板标签(Tab)组件了。
Tab 组件利用面板标签把不同的面板内容切换到屏幕上,以显示不同类别的内容。
下面通过一个实例来了解一下 Tab 组件的使用方法。在工程 WidgetDemo 的布局文件 main.xml 中添加一个名为 TabDemo 的 Button,用以启动 TabActivity。
在 main.xml 中添加代码如下:
1 2 3 4 5 | <Button android:id="@+id/button13" android:layout_width="wrap_content" android:layout_height="wrap_content" android:text="TabDemo"/> |
1 2 3 4 5 6 7 8 9 | Button tabbtn = (Button)this.findViewById(R.id.button13);tabbtn.setOnClickListener(new View.OnClickListener(){ @Override public void onClick(View v){ Intent intent; intent = new Intent(MainActivity.this,TabActivity .class); startActivity(intent); }}); |
<activity android:name=".TabActivity"/>
TabActivity 的运行效果如图 1 所示。图 1 TabActivity 的运行结果
要使用 Tab 必然涉及它的容器 TabHost,TabHost 包括 TabWigget 和 FrameLayout 两部分。TabWidget 就是每个 Tab 的标签,FrameLayout 是 Tab 的内容。
TabActivity 使用的布局文件是 tab.xml。在 tab.xml 中定义了每个 Tab 中要显示的内容,代码如下:
1 2 3 4 5 6 7 8 9 10 11 12 13 14 15 16 17 18 19 20 21 22 23 24 25 26 27 28 29 30 31 32 33 34 35 36 37 38 39 40 41 42 43 44 | <?xml version="1.0" encoding="utf-8"?><TabHost xmlns:android="http://schemas.android.com/apk/res/android" android:id="@+id/tabhost" android:layout_width="fill_parent" android:layout_height="fill_parent"> <LinearLayout android:layout_width="fill_parent" android:layout_height="fill_parent" android:orientation="vertical"> <TabWidget android:id="@android:id/tabs" android:layout_width="fill_parent" android:layout_height="wrap_content" /> <FrameLayout android:id="@android:id/tabcontent" android:layout_width="fill_parent" android:layout_height="fill_parent"> <TextView android:id="@+id/tab1" android:layout_width="wrap_content" android:layout_height="wrap_content" android:text="Tab1页面" android:textSize="40dp" /> <TextView android:id="@+id/tab2" android:layout_width="wrap_content" android:layout_height="wrap_content" android:text="Tab2页面" android:textSize="40dp" /> <TextView android:id="@+id/tab3" android:layout_width="wrap_content" android:layout_height="wrap_content" android:text="Tab3页面" android:textSize="40dp" /> </FrameLayout> </LinearLayout></TabHost> |
在主程序 TabActivity 的 OnCreate() 方法中,首先获得 TabHost 的对象,并调用 setup() 方法进行初始化,然后通过 TabHost.TabSpec 增加 Tab 页,通过 setContent() 增加当前 Tab 页显示的内容,通过 setIndicator 增加页的标签,最后设定当前要显示的 Tab 页。
TabActivity 的代码如下:
1 2 3 4 5 6 7 8 9 10 11 12 13 14 15 16 17 18 19 20 21 22 23 24 25 26 27 28 29 30 31 32 33 34 35 36 37 38 | package introduction.android.widgetdemo;import android.app.Activity;import android.os.Bundle;import android.widget.TabHost;public class TabActivity extends Activity { public void onCreate(Bundle savedInstanceState) { super.onCreate(savedInstanceState); setContentView(R.layout.tab); // 步骤1:获得TabHost的对象,并进行初始化setup() TabHost tabs = (TabHost) findViewById(R.id.tabhost); tabs.setup(); //步骤2:获得TabHost.TabSpec增加tab的一页,通过setContent()增加内容,通过setIndicator增加页的标签 /*增加第一个Tab */ TabHost.TabSpec spec = tabs.newTabSpec("Tag1"); //单击Tab要显示的内容 spec.setContent(R.id.tab1); /* 显示Tabl内容*/ spec.setIndicator("Tab1"); tabs.addTab(spec); /* 增加第二个Tab*/ spec = tabs.newTabSpec("Tag2"); spec.setContent(R.id.tab2);//单击Tab要显示的内容 /* 显示Tab2内容 */ spec.setIndicator("Tab2"); tabs.addTab(spec); /*增加第三个Tab */ spec = tabs.newTabSpec("Tag3"); spec.setContent(R.id.tab3);//单击Tab要显示的内容 /* 显示Tab3内容*/ spec.setIndicator("Tab3"); tabs.addTab(spec); /* 步骤3:可通过setCurrentTab(index)指定显示的页,从0开始计算*/ tabs.setCurrentTab(0); }} |
例如:
1 2 3 4 | Intent intent = new Intent().setClass(this,AlbumsActivity .class);spec = tabHost.newTabSpec("albums") .setIndicator("Albums",res.getDrawable(R.drawable.ic_tab_albums)).setContent(intent);tabHost.addTab(spec); |