
Android接收短信和发送短信 图片看不了?点击切换HTTP 返回上层
在学接收短信和发送短信之前,先简单介绍一下 SMS 短消息服务。
SMS(Short Message Service,短信息服务)是一种存储和转发服务。也就是说,短信息并不是直接从发信人发送到接收人,而是始终通过 SMS 中心进行转发。如果接收人处于未连接状态(可能电话已关闭),那么信息将在接收人再次连接时发送。
1)Android 应用程序必须具有接收 SMS 短信息的权限,在 AndroidManifest.xml 文件中配置如下:
2)Android 应用程序需要定义一个 BroadcastReceiver 的子类,并通过重载其 public void onReceive(Context arg0, Intent arg1) 方法来处理接收到短信息的事件。
3)在 AndroidManifest.xml 文件中对 BroadcastReceiver 子类的 <intent-filter> 属性进行配置,使其能够获取短信息接收 Action。配置如下:
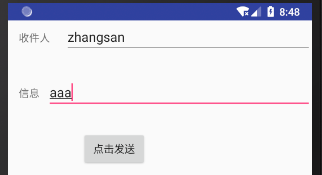
图 1 receiveMessageDemo实例
其 layout 文件 main.xml 的代码如下:
AndroidManifest.xml 文件的代码如下:
MainActivity.java 的代码如下:
Intent 广播接收器定义为 SmsReceiver,用于对接收到短信息的事件进行处理。
SmsReceiver. Java 的代码如下:
当接收到短信息后,onReceive 方法被调用。由于 Android 设备接收到的 SMS 短信息是 PDU(Protocol Description Unit) 形式的,因此通过 Bundle 类对象获取到 PDUS,并创建 SmsMessage 对象。然后从 SmsMessage 对象中提取出短信息的相关信息,并存储到 StringBuilder 类的对象中,最后使用 Toast 显示出来。
测试该实例时,可通过 AVD Mananger,再启动一个 AVD,通过 AVD 的短信程序向当前 AVD 号码发送短信,就可使该实例被触发运行。
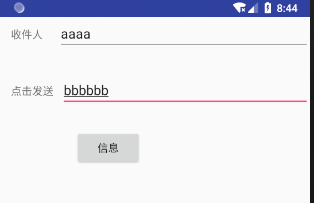
图 1 sendMessageDemo实例
在实例 sendMessageDemo 中,main.xml 的代码如下:
在实例 sendMessageDemo 中,AndroidManifest.xml 的代码如下:
在实例 sendMessageDemo 中,MainActivity.java 实现了发送短信的功能,其代码如下:
在实际应用该短信发送程序时,要注意一些限制问题,比如接收手机号码的格式、短信内容超过预定字符的提示等。
一般情况下,手机号码格式可以使用 Pattern 来设置,此外 Android SDK 提供了 PhoneNumberUtils 类来对电话号码格式进行处理,而短信内容超过 70 个字符会被自动分解为多条短信发送,在此不做具体描述。
SMS(Short Message Service,短信息服务)是一种存储和转发服务。也就是说,短信息并不是直接从发信人发送到接收人,而是始终通过 SMS 中心进行转发。如果接收人处于未连接状态(可能电话已关闭),那么信息将在接收人再次连接时发送。
接收短信
要使 Android 应用程序能够接收短信息,需要以下三个步骤:1)Android 应用程序必须具有接收 SMS 短信息的权限,在 AndroidManifest.xml 文件中配置如下:
<uses-permission android:name="android.permission.RECEIVE_SMS"/>
2)Android 应用程序需要定义一个 BroadcastReceiver 的子类,并通过重载其 public void onReceive(Context arg0, Intent arg1) 方法来处理接收到短信息的事件。
3)在 AndroidManifest.xml 文件中对 BroadcastReceiver 子类的 <intent-filter> 属性进行配置,使其能够获取短信息接收 Action。配置如下:
<intent-filter>
<action android:name="android.provider.Telephony.SMS_RECEIVED"
</intent-filter>
接收短信实例
实例 receiveMessageDemo 演示了接收短信并提示的过程,运行效果如图 1 所示。图 1 receiveMessageDemo实例
其 layout 文件 main.xml 的代码如下:
1 2 3 4 5 6 7 8 9 10 11 12 13 | <?xml version="1.0" encoding="utf-8"?><LinearLayout xmlns:android="http://schemas.android.com/apk/res/android" android:layout_width="fill_parent" android:layout_height="fill_parent" android:orientation="vertical"> <EditText android:id="@+id/editText1" android:layout_width="match_parent" android:layout_height="wrap_content" /> <requestFocus /></LinearLayout> |
1 2 3 4 5 6 7 8 9 10 11 12 13 14 15 16 17 18 19 20 21 22 23 24 25 26 27 28 29 | <?xml version="1.0" encoding="utf-8"?><manifest xmlns:android="http://schemas.android.com/apk/res/android" package="introduction.android.receivemessagedemo" android:versionCode="1" android:versionName="1.0"> <uses-sdk android:minSdkVersion="14" /> <uses-permission android:name="android.permission.RECEIVE_SMS" /> <application android:allowBackup="true" android:icon="@mipmap/ic_launcher" android:label="@string/app_name" android:roundIcon="@mipmap/ic_launcher_round" android:supportsRtl="true" android:theme="@style/AppTheme"> <activity android:name=".MainActivity"> <intent-filter> <action android:name="android.intent.action.MAIN" /> <category android:name="android.intent.category.LAUNCHER" /> </intent-filter> </activity> <receiver android:name="SmsReceiver"> <intent-filter> <action android:name="android.provider.Telephony.SMS_RECEIVED" /> </intent-filter> </receiver> </application></manifest> |
1 2 3 4 5 6 7 8 9 10 11 12 13 14 15 16 | package introduction.android.receivemessagedemo;import android.support.v7.app.AppCompatActivity;import android.os.Bundle;import android.widget.EditText;public class MainActivity extends AppCompatActivity { @Override protected void onCreate(Bundle savedInstanceState) { super.onCreate(savedInstanceState); setContentView(R.layout.activity_main); EditText text = (EditText) this.findViewById(R.id.editText1); text.setText("waiting....."); }} |
SmsReceiver. Java 的代码如下:
1 2 3 4 5 6 7 8 9 10 11 12 13 14 15 16 17 18 19 20 21 22 23 24 25 26 27 28 29 30 31 32 33 | package introduction.android.receivemessagedemo;import android.content.BroadcastReceiver;import android.content.Context;import android.content.Intent;import android.os.Bundle;import android.telephony.SmsMessage;import android.widget.Toast;/*** Created by leovo on 2019/4/10.*/public class SmsReceiver extends BroadcastReceiver { StringBuilder strb = new StringBuilder(); @Override public void onReceive(Context arg0, Intent arg1) { Bundle bundle = arg1.getExtras(); Object[] pdus = (Object[]) bundle.get("pdus"); SmsMessage[] msgs = new SmsMessage[pdus.length]; for (int i = 0; i < pdus.length; i++) { msgs[i] = SmsMessage.createFromPdu((byte[]) pdus[i]); } for (SmsMessage msg : msgs) { strb.append("发信人:\n"); strb.append(msg.getDisplayOriginatingAddress()); strb.append("\n信息内容\n"); strb.append(msg.getDisplayMessageBody()); } Toast.makeText(arg0, strb.toString(), Toast.LENGTH_LONG).show(); }} |
测试该实例时,可通过 AVD Mananger,再启动一个 AVD,通过 AVD 的短信程序向当前 AVD 号码发送短信,就可使该实例被触发运行。
发送短信
要实现发送短信功能,需要在 AndroidManifest.xml 文件中注册发送短信的权限,然后才可以使用发送短信功能。代码如下:<uses-permission android:name="android.permission.SEND_SMS"/>
发送短信使用的是 android.telephony.SmsManager 类的 sendTextMessage 方法,该方法定义如下:public void sendTextMessage(String destinationAddress, String scAddress, String text, PendingIntent sentIntent, PendingIntent deliveryIntent)
其中,各个参数的意义如下。
- destinationAddress:表示接收短信的手机号码。
- scAddress:短信服务中心号码,设置为 null 表示使用手机默认的短信服务中心。
- text:要发送的短信内容。
- sentIntent:当消息被成功发送给接收者时,广播该 PendingIntent。
- deliveryIntent:当消息被成功发送时,广播该 PendingIntent。
短信发送实例
实例sendMessageDemo 演示了发送短信的过程,其运行效果如图 1 所示。图 1 sendMessageDemo实例
在实例 sendMessageDemo 中,main.xml 的代码如下:
1 2 3 4 5 6 7 8 9 10 11 12 13 14 15 16 17 18 19 20 21 22 23 24 25 26 27 28 29 30 31 32 33 34 35 36 37 38 39 40 41 42 43 44 45 46 47 48 49 50 51 52 53 54 | <?xml version="1.0" encoding="utf-8"?><LinearLayout xmlns:android="http://schemas.android.com/apk/res/android" android:layout_width="fill_parent" android:layout_height="fill_parent" android:orientation="vertical"> <LinearLayout android:layout_width="fill_parent" android:layout_height="wrap_content" android:orientation="horizontal"> <TextView android:id="@+id/textview01" android:layout_width="wrap_content" android:layout_height="wrap_content" android:layout_marginLeft="15dp" android:text="收件人" /> <EditText android:id="@+id/edittext01" android:layout_width="fill_parent" android:layout_height="wrap_content" android:layout_marginLeft="20dp" /> </LinearLayout> <LinearLayout android:layout_width="fill_parent" android:layout_height="wrap_content" android:layout_marginTop="30dp" android:orientation="horizontal"> <TextView android:id="@+id/textview02" android:layout_width="wrap_content" android:layout_height="wrap_content" android:layout_marginLeft="15dp" android:text="@string/receiver" /> <EditText android:id="@+id/edittext02" android:layout_width="fill_parent" android:layout_height="wrap_content" android:layout_marginLeft="10dp" /> </LinearLayout> <Button android:id="@+id/button" android:layout_width="wrap_content" android:layout_height="wrap_content" android:layout_marginLeft="100dp" android:layout_marginTop="30dp" android:text="@string/msg" /></LinearLayout> |
1 2 3 4 5 6 7 8 9 10 11 12 13 14 15 16 17 18 19 20 21 22 23 24 25 26 27 28 29 | <?xml version="1.0" encoding="utf-8"?><manifest xmlns:android="http://schemas.android.com/apk/res/android" package="introduction.android.receivemessagedemo" android:versionCode="1" android:versionName="1.0"> <uses-sdk android:minSdkVersion="14" /> <uses-permission android:name="android.permission.SEND_SMS" /> <application android:allowBackup="true" android:icon="@mipmap/ic_launcher" android:label="@string/app_name" android:roundIcon="@mipmap/ic_launcher_round" android:supportsRtl="true" android:theme="@style/AppTheme"> <activity android:name=".MainActivity"> <intent-filter> <action android:name="android.intent.action.MAIN" /> <category android:name="android.intent.category.LAUNCHER" /> </intent-filter> </activity> <receiver android:name="SmsReceiver"> <intent-filter> <action android:name="android.provider.Telephony.SMS_RECEIVED" /> </intent-filter> </receiver> </application></manifest> |
1 2 3 4 5 6 7 8 9 10 11 12 13 14 15 16 17 18 19 20 21 22 23 24 25 26 27 28 29 30 31 32 33 34 35 36 37 38 39 40 41 42 43 44 45 46 47 48 49 50 51 52 | package introduction.android.receivemessagedemo;import android.app.Activity;import android.os.Bundle;import android.telephony.SmsManager;import android.view.View;import android.view.View.OnClickListener;import android.widget.Button;import android.widget.EditText;import android.widget.Toast;public class MainActivity extends Activity { /** * Called when the activity is first created. */ private Button button; private EditText edittext01, edittext02; @Override public void onCreate(Bundle savedInstanceState) { super.onCreate(savedInstanceState); setContentView(R.layout.activity_main); button = (Button) findViewById(R.id.button); button.setOnClickListener(new buttonListener()); } class buttonListener implements OnClickListener { @Override public void onClick(View v) { // TODO Auto-generated method stub edittext01 = (EditText) findViewById(R.id.edittext01); edittext02 = (EditText) findViewById(R.id.edittext02); String number = edittext01.getText().toString(); //获取手机号码 String messageOl = edittext02.getText().toString(); //获取短信内容 if (number.equals("") || messageOl.equals("")) //判断输入是否有空格 { Toast.makeText(MainActivity.this, "输入有误,请检查输入", Toast.LENGTH_LONG).show(); } else { SmsManager massage = SmsManager.getDefault(); massage.sendTextMessage(number, null, messageOl, null, null); //调用senfTextMassage方法来发送短信 Toast.makeText(MainActivity.this, "短信发送成功", Toast.LENGTH_LONG).show(); } } }} |
一般情况下,手机号码格式可以使用 Pattern 来设置,此外 Android SDK 提供了 PhoneNumberUtils 类来对电话号码格式进行处理,而短信内容超过 70 个字符会被自动分解为多条短信发送,在此不做具体描述。