
Android SQLite数据库操作实例 图片看不了?点击切换HTTP 返回上层
上一节教程我们主要介绍了如何使用 Android SQLite 数据库存储数据,那么这一节我们就来实际操作一下吧!
实例 MyDbDemo 演示了使用 SQLiteOpenHelper 和 SQLiteDatabase 对数据库进行操作的过程,其运行效果如图 1 所示。
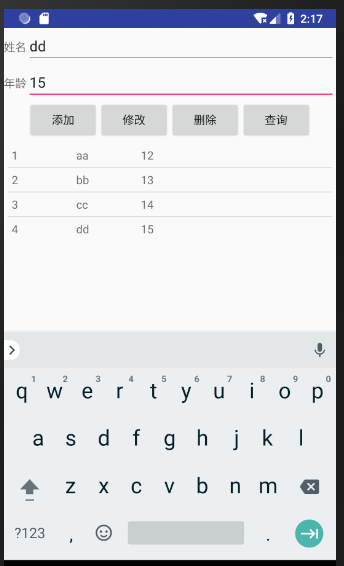
图 1 MyDbDemo界面
实例 MyDbDemo 使用 SQLiteOpenHelper 对象建立了数据库文件“mydb”,通过 SQLiteDatabase 对象对该数据库进行数据的查询、插入、修改和删除操作,并显示到 ListView 组件中。
实例 MyDbDemo 的运行界面实际上由两个 XML 文件组成,分别是 main.xml 和 listview.xml。其中 main.xml 文件的代码如下:
由代码可见,main.xml 实际上实现的是如图 2 所示的效果。
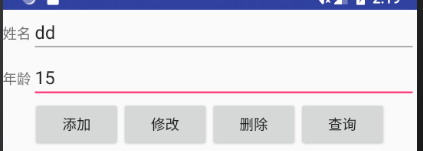
图 2 main.xml 界面
该布局中放置了两个 TextView、两个 EditText 和 4 个按钮,在按钮的下面是一个 ListView 组件,但是该 ListView 没有对显示效果进行任何的限制。
实例 MyDbDemo 中 listview.xml 文件的代码如下:
可见 listview.xml 布局中横向放置了三个 TextView 用于显示数据。
该实例实际的运行效果是使用 listview.xml 中的数据格式替换 main.xml 中 ListView 组件的数据格式后实现的。该效果通过 LayoutInflater 类的对象进行实现。
实例 MyDbDemo 中 AndroidManifest.xml 文件的代码如下:
实例 MyDbDemo 中 SQLiteOpenHelper 的子类 dbHelper 的实现代码如下:
子类 dbHelper 重写了父类 SQLiteOpenHelper 的两个抽象方法 onCreate() 和 onUpgrade()。
在 onCreate() 方法中创建了一个名为 friends 的数据表,该数据表有 _id、name 和 age三个字段,其中 _id 为自增加主键。
onUpgrade() 方法实现了删除现有数据表并且重建的功能。
实例 MyDbDemo 中的主 Activity 所对应文件 MainActivity.java 的代码如下:
MainActivity 在 onCreate() 方法中调用 dbHelper 创建了数据库文件“mydb”,获取到该数据库的可写 SQLiteDatabase 对象,并将数据库中所有的数据显示到 listview 中。
MainActivity 为 main.xml 中的 4 个按钮分别添加按钮单击监视器并进行处理,通过 SQLiteDatabase 对象实现对数据库的 CRUD 操作。
其中:
这几行代码通过 SimpleAdapter 将 listview.xml 文件中定义的 TextView 组件与 main.xml 中的 ListView 组件进行关联,这样就使 main.xml 中的 ListView 组件以 listview.xml 文件中定义的格式将数据显示出来。
这几行代码从 friends 数据表中查询出所有数据,并按_id升序排列。
cursor.getString() 方法按照列将每条数据的对应字段分别取出来,通过 while 循环将所有数据保存到 data 中。
这几行代码为 ListView 组件添加了单击监听器,并对单击事件进行了处理。
当用户单击 ListView 组件中的某条数据时,将该条数据的 name 和 age 字段显示到 main.xml 文件的 EditText 中,并将该记录的“_id”值存储到 selId 中,以便于对该条记录进行操作。
实例 MyDbDemo 中对数据库的 CRUD 操作分别通过 SQLiteDatabase 对象的 query、insert、update、delete 方法实现,此处不再描述。
实例 MyDbDemo 演示了使用 SQLiteOpenHelper 和 SQLiteDatabase 对数据库进行操作的过程,其运行效果如图 1 所示。
图 1 MyDbDemo界面
实例 MyDbDemo 使用 SQLiteOpenHelper 对象建立了数据库文件“mydb”,通过 SQLiteDatabase 对象对该数据库进行数据的查询、插入、修改和删除操作,并显示到 ListView 组件中。
实例 MyDbDemo 的运行界面实际上由两个 XML 文件组成,分别是 main.xml 和 listview.xml。其中 main.xml 文件的代码如下:
1 2 3 4 5 6 7 8 9 10 11 12 13 14 15 16 17 18 19 20 21 22 23 24 25 26 27 28 29 30 31 32 33 34 35 36 37 38 39 40 41 42 43 44 45 46 47 48 49 50 51 52 53 54 55 56 57 58 59 60 61 62 63 64 65 66 67 68 69 70 71 72 73 74 75 76 77 78 79 80 81 82 83 84 85 86 | <?xml version="1.0" encoding="utf-8"?><LinearLayout xmlns:android="http://schemas.android.com/apk/res/android" android:layout_width="fill_parent" android:layout_height="fill_parent" android:orientation="vertical"> <LinearLayout android:layout_width="fill_parent" android:layout_height="wrap_content" android:addStatesFromChildren="true"> <TextView android:layout_width="wrap_content" android:layout_height="wrap_content" android:text="姓名" android:textColor="?android:attr/textColorSecondary" /> <EditText android:id="@+id/et_name" android:layout_width="wrap_content" android:layout_height="wrap_content" android:layout_weight="1" android:singleLine="true" /> </LinearLayout> <LinearLayout android:layout_width="fill_parent" android:layout_height="wrap_content" android:addStatesFromChildren="true"> <TextView android:layout_width="wrap_content" android:layout_height="wrap_content" android:text="年龄" android:textColor="?android:attr/textColorSecondary" /> <EditText android:id="@+id/et_age" android:layout_width="wrap_content" android:layout_height="wrap_content" android:layout_weight="1" android:singleLine="true" /> </LinearLayout> <LinearLayout android:layout_width="fill_parent" android:layout_height="wrap_content" android:addStatesFromChildren="true" android:gravity="center"> <Button android:id="@+id/bt_add" android:layout_width="wrap_content" android:layout_height="wrap_content" android:onClick="addbutton" android:text="添加"></Button> <Button android:id="@+id/bt_modify" android:layout_width="wrap_content" android:layout_height="wrap_content" android:onClick="updatebutton" android:text="修改"></Button> <Button android:id="@+id/bt_del" android:layout_width="wrap_content" android:layout_height="wrap_content" android:onClick="updatebutton" android:text="删除"></Button> <Button android:id="@+id/bt_query" android:layout_width="wrap_content" android:layout_height="wrap_content" android:onClick="querybutton" android:text="查询"></Button> </LinearLayout> <ListView android:id="@+id/listView" android:layout_width="fill_parent" android:layout_height="wrap_content" android:padding="5dip"></ListView></LinearLayout> |
图 2 main.xml 界面
该布局中放置了两个 TextView、两个 EditText 和 4 个按钮,在按钮的下面是一个 ListView 组件,但是该 ListView 没有对显示效果进行任何的限制。
实例 MyDbDemo 中 listview.xml 文件的代码如下:
1 2 3 4 5 6 7 8 9 10 11 12 13 14 15 16 17 18 19 20 21 22 | <?xml version="1.0" encoding="utf-8"?><LinearLayout xmlns:android="http://schemas.android.com/apk/res/android" android:id="@+id/linear" android:layout_width="wrap_content" android:layout_height="wrap_content" android:padding="5dip"> <TextView android:id="@+id/tvID" android:layout_width="80dp" android:layout_height="wrap_content" /> <TextView android:id="@+id/tvName" android:layout_width="80dp" android:layout_height="wrap_content" /> <TextView android:id="@+id/tvAge" android:layout_width="80dp" android:layout_height="wrap_content" /></LinearLayout> |
该实例实际的运行效果是使用 listview.xml 中的数据格式替换 main.xml 中 ListView 组件的数据格式后实现的。该效果通过 LayoutInflater 类的对象进行实现。
实例 MyDbDemo 中 AndroidManifest.xml 文件的代码如下:
1 2 3 4 5 6 7 8 9 10 11 12 13 14 15 16 17 18 19 20 21 22 23 | <?xml version="1.0" encoding="utf-8"?><manifest xmlns:android="http://schemas.android.com/apk/res/android" package="introduction.android.mydbdemo" android:versionCode="1" android:versionName="1.0"> <uses-sdk android:minSdkVersion="14" /> <application android:allowBackup="true" android:icon="@mipmap/ic_launcher" android:label="@string/app_name" android:roundIcon="@mipmap/ic_launcher_round" android:supportsRtl="true" android:theme="@style/AppTheme"> <activity android:name=".MainActivity"> <intent-filter> <action android:name="android.intent.action.MAIN" /> <category android:name="android.intent.category.LAUNCHER" /> </intent-filter> </activity> </application></manifest> |
1 2 3 4 5 6 7 8 9 10 11 12 13 14 15 16 17 18 19 20 21 22 23 24 25 26 27 28 29 30 31 32 | package introduction.android.mydbdemo;import android.content.Context;import android.database.sqlite.SQLiteDatabase;import android.database.sqlite.SQLiteDatabase.CursorFactory;import android.database.sqlite.SQLiteOpenHelper;public class dbHelper extends SQLiteOpenHelper { public static final String TB_NAME = "friends"; public dbHelper(Context context, String name, CursorFactory factory, int version) { super(context, name, factory, version); // TODO Auto-generated constructor stub } @Override public void onCreate(SQLiteDatabase db) { // TODO Auto-generated method stub db.execSQL("CREATE TABLE IF NOT EXISTS " + TB_NAME + " ( _id integer primary key autoincrement," +// "name varchar," + "age integer" + ") "); } @Override public void onUpgrade(SQLiteDatabase db, int oldVersion, int newVersion) { // TODO Auto-generated method stub db.execSQL("DROP TABLE IF EXISTS " + TB_NAME); onCreate(db); }} |
在 onCreate() 方法中创建了一个名为 friends 的数据表,该数据表有 _id、name 和 age三个字段,其中 _id 为自增加主键。
onUpgrade() 方法实现了删除现有数据表并且重建的功能。
实例 MyDbDemo 中的主 Activity 所对应文件 MainActivity.java 的代码如下:
1 2 3 4 5 6 7 8 9 10 11 12 13 14 15 16 17 18 19 20 21 22 23 24 25 26 27 28 29 30 31 32 33 34 35 36 37 38 39 40 41 42 43 44 45 46 47 48 49 50 51 52 53 54 55 56 57 58 59 60 61 62 63 64 65 66 67 68 69 70 71 72 73 74 75 76 77 78 79 80 81 82 83 84 85 86 87 88 89 90 91 92 93 94 95 96 97 98 99 100 101 102 103 104 105 106 107 108 109 110 111 112 113 114 115 116 117 118 119 120 121 122 123 124 125 126 127 128 129 130 131 132 133 134 135 136 137 138 139 140 141 142 143 144 145 146 147 148 149 150 151 152 153 154 155 156 157 158 159 160 161 162 163 164 165 | package introduction.android.mydbdemo;import android.app.Activity;import android.content.ContentValues;import android.database.Cursor;import android.database.sqlite.SQLiteDatabase;import android.os.Bundle;import android.util.Log;import android.view.View;import android.widget.AdapterView;import android.widget.Button;import android.widget.EditText;import android.widget.ListView;import android.widget.SimpleAdapter;import java.util.ArrayList;import java.util.HashMap;import java.util.Map;public class MainActivity extends Activity { private static String DB_NAME = "mydb"; private EditText et_name; private EditText et_age; private ArrayList<Map<String, Object>> data; private dbHelper dbHelper; private SQLiteDatabase db; private Cursor cursor; private SimpleAdapter listAdapter; private View view; private ListView listview; private Button selBtn, addBtn, updBtn, delBtn; private Map<String, Object> item; private String selId; private ContentValues selCV; /** * Called when the activity is first created. */ @Override public void onCreate(Bundle savedInstanceState) { super.onCreate(savedInstanceState); setContentView(R.layout.activity_main); et_name = (EditText) findViewById(R.id.et_name); et_age = (EditText) findViewById(R.id.et_age); listview = (ListView) findViewById(R.id.listView); selBtn = (Button) findViewById(R.id.bt_query); addBtn = (Button) findViewById(R.id.bt_add); updBtn = (Button) findViewById(R.id.bt_modify); delBtn = (Button) findViewById(R.id.bt_del); selBtn.setOnClickListener(new Button.OnClickListener() { @Override public void onClick(View v) { // TODO Auto-generated method stub dbFindAll(); } }); addBtn.setOnClickListener(new Button.OnClickListener() { @Override public void onClick(View v) { // TODO Auto-generated method stub dbAdd(); dbFindAll(); } }); updBtn.setOnClickListener(new Button.OnClickListener() { @Override public void onClick(View v) { // TODO Auto-generated method stub dbUpdate(); dbFindAll(); } }); delBtn.setOnClickListener(new Button.OnClickListener() { @Override public void onClick(View v) { // TODO Auto-generated method stub dbDel(); dbFindAll(); } }); dbHelper = new dbHelper(this, DB_NAME, null, 1); db = dbHelper.getWritableDatabase();// 打开数据库 data = new ArrayList<Map<String, Object>>(); dbFindAll(); listview.setOnItemClickListener(new AdapterView.OnItemClickListener() { @Override public void onItemClick(AdapterView<?> parent, View v, int position, long id) { // TODO Auto-generated method stub Map<String, Object> listItem = (Map<String, Object>) listview.getItemAtPosition(position); et_name.setText((String) listItem.get("name")); et_age.setText((String) listItem.get("age")); selId = (String) listItem.get("_id"); Log.i("mydbDemo", "id=" + selId); } }); } //数据删除 protected void dbDel() { // TODO Auto-generated method stub String where = "_id=" + selId; int i = db.delete(dbHelper.TB_NAME, where, null); if (i > 0) Log.i("myDbDemo", "数据删除成功!"); else Log.i("myDbDemo", "数据未删除!"); } private void showList() { // TODO Auto-generated method stub listAdapter = new SimpleAdapter(this, data, R.layout.listview, new String[]{"_id", "name", "age"}, new int[]{R.id.tvID, R.id.tvName, R.id.tvAge}); listview.setAdapter(listAdapter); } //更新列表中的数据 protected void dbUpdate() { // TODO Auto-generated method stub ContentValues values = new ContentValues(); values.put("name", et_name.getText().toString().trim()); values.put("age", et_age.getText().toString().trim()); String where = "_id=" + selId; int i = db.update(dbHelper.TB_NAME, values, where, null); if (i > 0) Log.i("myDbDemo", "数据更新成功!"); else Log.i("myDbDemo", "数据未更新"); } //插入数据 protected void dbAdd() { // TODO Auto-generated method stub ContentValues values = new ContentValues(); values.put("name", et_name.getText().toString().trim()); values.put("age", et_age.getText().toString().trim()); long rowid = db.insert(dbHelper.TB_NAME, null, values); if (rowid == -1) Log.i("myDbDemo", "数据插入失败!"); else Log.i("myDbDemo", "数据插入成功!" + rowid); } //查询数据 protected void dbFindAll() { // TODO Auto-generated method stub data.clear(); cursor = db.query(dbHelper.TB_NAME, null, null, null, null, null, "_id ASC"); cursor.moveToFirst(); while (!cursor.isAfterLast()) { String id = cursor.getString(0); String name = cursor.getString(1); String age = cursor.getString(2); item = new HashMap<String, Object>(); item.put("_id", id); item.put("name", name); item.put("age", age); data.add(item); cursor.moveToNext(); } showList(); }} |
MainActivity 为 main.xml 中的 4 个按钮分别添加按钮单击监视器并进行处理,通过 SQLiteDatabase 对象实现对数据库的 CRUD 操作。
其中:
1 2 3 4 5 | listAdapter = new SimpleAdapter(this, data, R.layout.listview, new String[]{"_id", "name", "age"}, new int[]{R.id.tvID, R.id.tvName, R.id.tvAge});listview.setAdapter(listAdapter); |
1 2 3 4 5 6 7 8 9 10 11 12 13 | cursor = db.query(dbHelper.TB_NAME, null, null, null, null, null, "_id ASC");cursor.moveToFirst();while (!cursor.isAfterLast()) { String id = cursor.getString(0); String name = cursor.getString(1); String age = cursor.getString(2); item = new HashMap<String, Object>(); item.put("_id", id); item.put("name", name); item.put("age", age); data.add(item); cursor.moveToNext();} |
cursor.getString() 方法按照列将每条数据的对应字段分别取出来,通过 while 循环将所有数据保存到 data 中。
1 2 3 4 5 6 7 8 9 10 11 | listview.setOnItemClickListener(new AdapterView.OnItemClickListener() { @Override public void onItemClick(AdapterView<?> parent, View v, int position, long id) { // TODO Auto-generated method stub Map<String, Object> listItem = (Map<String, Object>) listview.getItemAtPosition(position); et_name.setText((String) listItem.get("name")); et_age.setText((String) listItem.get("age")); selId = (String) listItem.get("_id"); Log.i("mydbDemo", "id=" + selId); }}); |
当用户单击 ListView 组件中的某条数据时,将该条数据的 name 和 age 字段显示到 main.xml 文件的 EditText 中,并将该记录的“_id”值存储到 selId 中,以便于对该条记录进行操作。
实例 MyDbDemo 中对数据库的 CRUD 操作分别通过 SQLiteDatabase 对象的 query、insert、update、delete 方法实现,此处不再描述。